

The Manifestation of Our First Big Idea
Jan 2011
So, we started planning our first real project - building a garden. Honestly, I started obsessively researching garden stuff, and what types of seeds to buy way beforehand, because I have no patience and want to do everything NOW. If I had my way, a weekend would consist of painting a room, planting an entire bed, and installing crown molding throughout the house.
Reality is not my specialty.
One day we randomly decided to go into a Lowes, and stumbled upon Deal of Greatness. Apparently, the lumber guys had a whole bunch of nice cedar boards that were not perfect, and they wanted to get rid of them. If we took the whole stack, they would sell them to us for $5 a board instead of the normal $30. Um, yes please! I tired not to be too giddy and probably failed miserably - I more than likely looked like I forgot to take my anti-psychotics for the day.
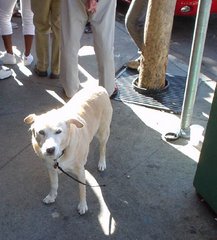
More to the point, this series of events led to the photo below:
 The yard before Garden of Greatness
If you squint, you can see sticks poking out of the ground: this was our way of trying to envision/measure the future garden. It was also a really bad plan, because Koa is extremely fond of sticks and kept creeping in and absconding with them. After a few minutes, there would be one or two forlorn sticks poking up out of the ground.

 So, cutting. I am mortally afraid that I will have an attack of clumsiness and cut off body parts while operating anything that involves sharp edges and electricity, so I left this one to David.
 I believe this is the inaugural use of the miter saw, as well as the stand he got for Christmas (thanks mom!) so that he could finally actually use the saw.
 This actually takes longer than you'd think, and so I have lots of unnecessary pictures of David in Deep Concentration.
 After a while I started to have boards to play with. SO much better than hard to see, quickly disappearing sticks.
 You can see that rosemary bush is still in the middle of the yard. I put it there when we moved in because there was this odd hole in the yard that was full of sand. As far as I know, not a whole lot can grow in sand. So I dug it out and filled in the hole with some nice dirt from Home We Own Your Paycheck Depot. Then I thought about what a waste of some very nice dirt, so I transplanted our one plant that made the move with us. David thought I was crazy, but luckily, he was indulgent.
 One completed bed! It is upside down right now. At the time I was proud how sturdy those supports looked. Later, I cursed them.
But that's another post.
 After they were put together, I made my contribution of sanding the whole thing down and coating the outside with polyurethane. This was completely unnecessary, but it definitely helped with aesthetics.
 Those of you eating our produce, don't worry - I didn't paint the inside.
 Three little piggies! Ah ah ah! (in the voice of the Count from Sesame Street)

The dogs decided to help in the form of LICKING THE DANGEROUS CHEMICALS OFF THE BOARDS. Sigh. I spend a lot of time lunging around, trying to spray them in the mouth with a hose and praying they wouldn't sprout an extra tail or something.
So, construction complete. From drawing the plans to scale to letting the sealant dry, this took approx. 3 weeks.
Of course, it was like 2 months until we actually got around to putting them in the ground.
For those who are interested, here was our plan of action for planning a garden bed:
- Watch your backyard during the summer (the light changes drastically in the winter) and locate the absolute sunniest part of your lawn. Nothing is more important - plants just won't produce without 6-8 hours of sun at the very least. I ended up spending one Saturday taking pictures of the backyard every hour to note how the sun moves across it.
- Draw a to scale your backyard using graph paper and plot out the size and design of your garden. The local library will be your good friend for design ideas and construction.
- Plan your cuts. Each of our garden beds were 8 x 4 x 6 x 2 x 2. This way, we only had to make a few cuts per board with no waste. (our boards were each 10' long)
- Buy materials. We used:
- cedar boards - they supposedly help with insects, mainly termites. Heaven knows we still needed to use insecticide. Or maybe we just don't realize how bad it could be. We used 10'x8"x1" for the main boards, and 4x4s for supports at the joints.
- decking screws made especially not to rust. You can go crazy-style with much more sturdy fastenings, like bolts, but we thought this might be a tad unnecessary. It seems to be holding up well so far.
- Minwax semi-gloss polyurethane - use a natural-bristle brush, and wear gloves!!
-Repeat appox a billion times
- To build a very sturdy bed, have the 4x4s extend about a foot past the base of the bed. To do this, build the bed upside down on a flat surface.
-Be sure to pre-drill the holes where the screws will go.
- Make prodigious use of an electric drill and screw the boards together.
- Ta-da! Flip over, sand and give 2 coats of polyurethane, on the outside of the bed only.
The end. Now all you have to do is install it, digging until your arm muscles mutiny.
1 comment:
I had no inkling how much manual labor creating a garden can be until we tackled our first one. But ours had a lot more to do with removing the grass followed by piles of bricks, metal pieces, and Taco Bell bags to a depth of two feet. Unfortunately, removing the construction materials so thoughtfully buried in our yard created a massive hole which then needed to be filled with insane amounts of expensive dirt. I guess we could've avoided this by creating an above-ground garden, but we're not that smart. Besides, I'm not sure it's less work, according to your post. Looks great, though! Tell David his manliness and attention to detail is impressive.
Post a Comment