Monday, April 13, 2009

Alcoholic Cupcakes


Admit it, as soon as you read the title, you were intrigued.


Don't call the AA, people - I haven't gone over to the dark side or anything. David and I were having some people over to the house for some snacks and drinks, and I thought, 'why not cocktail cupcakes!?' because this is me we're talking about here, and I'll fit sugar in anywhere I can.


In truth, this was one rushed whack job. I was going at full speed, and finished, covered in icing, literally 2 minutes before everyone was supposed to start arriving. I picked up all the dirty dishes and piping bags and threw them in the spare bedroom, cuz that's how I roll.


I made one batch of plain butter cake (box mix! gasp!) cupcakes for the sake of time, and just adjusted the frosting. I went with Margarita Cupcakes, Bailey's Mint, and plain vanilla in case those were gross.


Just a moment about box mixes. For some reason, they have a bad rap. I freaking love box mixes. If you do them right, they are awesome. Whenever people compliment me when I've used one, and I get all awkward, wondering if I should correct them. If in a rush, I usually just spruce up a box mix with 1/3 cup of melted chocolate. Or, to go super-easy, you could use candy melts as well. Tastes almost just as good, and they're already tempered. The only thing that you lose out on box mixes is the texture. You can never get that super-fine, tender crumb you can with do-it-yourself cake flour, and at the very worst you can end up with cornbread-looking crumb, which is terrible. Really, it's all about the bake time. Use the printed times as a VERY loose guide. And don't open the oven until you have to. I kind of hit the door, which causes the batter to jiggle a bit if it's not finished baking. This way, I don't cause a drastic drop in temp checking on it. You should pull your baked goods out of the oven before the edges start to pull away from the pan.


So here are the final thoughts:


Margarita Cupcakes: Fun and actually decent tasting, your guests will enjoy the novelty. I was concerned, bc tequila is used in the frosting, and tequila is nasty tasting. Here it is well tempered with some fresh lime. When making the frosting, I ignored the directions, and just added the tequila and lime a little at a time until I thought it tasted right. To each their own.


Bailey's: So I basically saw the recipe, thought it was a good idea, and ignored all directions, making my own, faster (and nastier) recipe. Party fail. The original recipe is probably good. No time! So, not measuring anything, I just mixed random stuff together. Mix some cream cheese, sugar, vanilla, milk and some Baileys together to knock your socks off. It's great on strawberries. I then squeezed this filling into the cupcake via cool pastry tips I have. Nnuyh nnyuh.
The idea of this cupcake was a mint Baileys mix, with the Baileys filling and minty frosting. However, it was a complete failure, because for the life of me I could not get the frosting to taste like anything other than really sweet toothpaste. Which is gross. I was going to drizzle chocolate across the top to bring it all together, but ran out of time. The might have helped, but I dunno. Maybe next time it'll be regular frosting drizzled with melted Andes mints. That might be good. The recipe below might be good too - just lay off the peppermint extract in the frosting. Let me know.

Vanilla: Who doesn't love a good vanilla cupcake? Classic.


Bailey’s Mint Chocolate Chip Cupcakes


  • 1 1/3 cups all purpose flour


  • 1/2 tsp baking powder


  • 1/4 tsp baking soda


  • 1/4 tsp salt


  • 1/3 cup butter, softened


  • 1 cup sugar


  • 2 large eggs


  • 1 tsp vanilla extract


  • 1/2 cup Chocolate Mint Bailey’s Irish Cream(or regular Bailey’s + 1/2 tsp peppermint extract)


  • 1/4 cup milk


  • 2/3 cup mini chocolate chips


Preheat oven to 350F. Line baking tin of your choice - mini muffin pan or regular cupcake pan - with paper liners.In a small bowl, whisk together flour, baking powder, baking soda and salt.In a large bowl, cream together butter and sugar until light and fluffy. Beat in eggs one at a time, followed by vanilla extract. Mix in half of the flour mixture, followed by the irish cream and milk, then mix in the remaining flour mixture. Stir in chocolate chips.Distribute batter evenly into prepared muffin cups (each will be roughly 2/3 or 3/4 full).Bake regular-sized cupcakes for 18-21 minutes.Bake mini cupcakes for 10-12 minutes.A tester inserted into the center will come out clean when the cupcakes are done. Tops should be domed and very lightly browned.Cool on a wire rack before frosting.


Mint Icing


  • 4 tbsp butter, softened


  • 2 cups confectioners’ sugar


  • 2 tbsp milk or cream


  • 1 tsp peppermint extract


Mix all ingredients in a small bowl until smooth. Spread a medium thin layer on top of each cooled cupcake.


Makes 48 mini cupcakes or 16 regular cupcakes.


Margarita Cupcakes


  • 1/4 cup lime juice


  • 1 1/2 tsp lime zest (1 lime)


  • 1 cup milk (plain or vanilla)


  • 1/4 cup vegetable oil


  • 2 tsp tequila


  • 1/2 tsp vanilla extract


  • 1 cup sugar


  • 1 1/3 cup all purpose flour


  • 1/4 tsp baking soda


  • 1/2 tsp baking powder


  • 1/2 tsp salt


Preheat oven to 350F. Fill a 12-cup muffin tin with liners.In a large bowl, mix together lime juice, lime zest, soy milk, oil , tequila, vanilla and sugar.In a small bowl, mix together flour, baking soda, baking powder and salt. Add to lime mixture and stir until just combined. Divide evenly into muffin tins.Bake for 20-24 minutes, until a tester comes out clean and the cakes spring back when lightly pressed.Turn out onto a wire rack to cool completely before frosting.


Tequila and Lime Frosting


  • 1/4 cup butter or nonhydrogenated shortening, softened


  • 1 tbsp milk


  • 3 tbsp lime juice


  • 1 tbsp tequila


  • 2+ cups confectioners’ sugar


  • coarse sugar for “rims”


Cream together butter/shortening), milk, lime juice, tequila, and 2 cups of confectioners’ sugar. Add in more sugar as needed to make frosting stiff, but spreadable.Spread on cupcakes and roll the edges in a small amount of coarse, colored sugar (poured into a small bowl, so it’s easy to direct it.


Carnival in the Casa


Do you see that cord running over the door? This old apt, in addition to having only 5 outlets TOTAL IN THE WHOLE PLACE, has the cable jack way back in the kitchen. So this cord has to go all the way around the room, looking ghetto, until it reaches the TV. Occasionally the classy Ductape job will come loose and tangle around the upper hinge, causing the door to jam a quarter of the way upon opening. My expectations of a clear doorway and forward momentum will cause me to jam through the crack, trip over the now-loose wire, and fall on the tile. Or my dog. I will not miss this.


Sorry, this has nothing to do with food. End Rant.


This week, we tackle....corn dogs.

I am sensing an unhealthy trend here - why is around 40% of all my experiments fried? Possibly because I consider anything to be fried delicious? Or because I usually never do it? The world may never know.

You might be wondering where all this oil is coming from. When my sister moved, I suddenly became the proud owner of 3 gallons of vegetable oil. Add that to my existing 2 gallons purchased via Costco, and that is a lot of oil. Now I need to get rid of it before I move - hence, frying everything in sight. Besides, you should NEVER re-used fry oil; the high temperatures break down the oil molecules, and bad things happen. Too lazy to get into it here. Just don't do it.


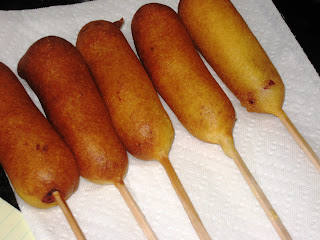
doggies in a row

Anyway, corn dogs. I love corn dogs. Crispy coating with a hint of corn yumminess surrounding a hog dog; which, although it is mystery meat, the fact that I could not have them as a child makes me want them as an adult, and damn the consequences. I'm pretty sure psychology would have something to say about this.

I picked this recipe, because I noticed bacon in the ingredient list. Bacon, people. That automatically means that this is going to be awesome, because nothing tastes bad when bacon's involved. When you want something to be great, what do chefs do? Wrap it in bacon. From filet mignon to fried mac and cheese. (Yes, Bacon-wrapped fried mac and cheese. It might even be too much for me. Naturally, we have Paula Deen, who is trying to reduce the world population via heart disease, to thank for that little gem).

All in all, the technique level is pretty low on this one:

  • grab hot dog


  • insert stick


  • dunk in batter


  • fry


  • shove in face


  • get fat


  • repeat


Impaled! I used disposable chopsticks for the skewers.
Once prepped, I put the batter in a tall, thin glass. and dunked in the hot dog. Then, into the oil!

At this point, a problem became apparent. When you think of Ball Park franks, what immediately pops into your brain? If you're a giant reservoir of product jingles like most of the nation, your brain will start shrieking, 'They plump when you cook 'em!!'

My brain did not chime in with this tidbit of information while in the grocery store. It was too busy screaming, 'Hot dogs! Yay! I can eat these without feeling like a bad person, because it's all for the blog right? Ooo, Ballparks, my favorite. They are big too, so the chopsticks won't crumble them. Huzzah! La de dah...' And so on.


So, when the actual cooking began, guess what happened!? They freaking plumped. But not after the batter had already set, so.....


This picture seems almost indecent - like a hot dog strip show. Take it off, baby!


It busted out of that shell Hulk-style. I proceeded to be pissed. What a waste - now I had all these hot dogs that were going to be unfulfilled corn dogs. I decided, screw it. I was going to finish these off, by god, because I'm not sure what else to do with 7 hot dogs on sticks. So I just lowered the temp of the oil in a last-ditch effort to not cook the breading before the plumping action took place.


Miraculously, it worked. Surprised all around. So, the dipping and frying commenced. And there was joy.


Hey! They look like actual corn dogs!


I was pretty pleased.


David was very pleased. For all his being 'grossed out' by fried, fatty things, he sure doesn't have any problem devouring them in mass quantities if I put it in front of him. He wanted to keep eating them, so I had to pack the extras away in the freezer before his heart exploded.


I asked for an action shot, and I get this - Mindless Zombie Eating Corn Dog


They were prefect dogs, taste-wise. I think that little bit of bacon grease really made the difference.


Behold - Le Corn Dog


Homemade Corn Dogs

INGREDIENTS
1 quart oil for deep frying
1 cup all-purpose flour
2/3 cup yellow cornmeal
1/4 cup white sugar
1 1/2 teaspoons baking powder
1 teaspoon salt
2 tablespoons bacon drippings
1 egg, beaten
1 1/4 cups buttermilk
1/2 teaspoon baking soda
2 pounds hot dogs
wooden sticks (I used chopsticks)


DIRECTIONS
1. Heat oil in a deep fryer to 365 degrees F (185 degrees C).
2. In a large bowl, stir together the flour, cornmeal, sugar, baking powder and salt. Stir in melted bacon drippings. Make a well in the center, and pour in the egg, buttermilk, and baking soda. Mix until everything is smooth and well blended. Pour it into a tall drinking glass.
3. Pat the hot dogs dry with paper towels so that the batter will stick. Insert wooden sticks into the ends. Dip the hot dogs in the batter one at a time, shaking off the excess. Deep fry a few at a time in the hot oil until they are as brown as you like them. Drain on paper towels or serve on paper plates.


  • If you have trouble getting your batter to stick, dip the battered dog into the hot oil for just a couple of seconds to set a thin layer of batter. Allow it to cool a bit then re-batter it. The second layer will stick much better.Allow corn dogs to cool to room temperature then place on a baking sheet and freeze. Once they are fully frozen, put them into freezer bags. Reheat them at 400°F in the oven for about 20 min and serve with plenty of ketchup and mustard!


Cutness FAIL


Ok, before you get all excited, that picture above is NOT mine. It was the inspiration of what was supposed to be this week's Adventure in Baking. Although in all fairness, it was an adventure - just not a particularly good one.


What you are looking at are called Cake Pops - and there's this lady on the Internet that is all kind of famous for it, in foodie circles.


Or with people like me, who stalk people with actual talent in some kind of act of latent jealousy.


So I wanted to try my hand. I mean, it's just cake dipped in chocolate with various sprinkles stuck on them. How hard could it be? I am the Cake Queen, after all!

Say goodbye, ego and self-esteem!


Ok, here we are, starting with the base. I baked a strawberry cake, and at this point I've crumbed it and added in the frosting. It's genius - cake with frosting already in it! Good ideas like this seem so obvious, but I would never think of it myself. That's kind of depressing for me. Although, it looks kind of disgusting, like some kind of mincemeat. David LOVED it though. He said it was like a 'super-moist cake brownie thing'.

Cake Balls


Going good so far - I'm going to attempt to make the bunnies, eggs, and chicks. I LOVED the chicks with their little basketball bodies and tiny feet. You can kind of see what each ball's intended for. Well, I can, anyway. To attach the handles, you just dip the stick into some melted chocolate and push it into the cake ball.


Like so

In lollipop form


Into the freezer!


While freezing, I thought I'd get all my accoutrements ready into stations. Here I am making bunny butts! Cute. They are just marshmallows that I've scored to look more like a tail.

Actually, these things call for all kinds of random crap that I could not find anywhere in Hawaii. I've been planning on doing these for a few weeks, since the tutorials got posted last month. In retrospect, they were probably posted early so that intelligent people could give it a test run before the big day. I am not that person. Instead, I spent the weeks scouring the island, trying to find different kinds of sprinkles. I found one kind. Thus, I spent an hour painstakingly cutting sprinkles to form wings, beaks, noses, etc. I had marginal hope for the endeavor.

I tried. I did. I thought I'd start out with the bunnies, because they looked the easiest. As I started dipping, my recurring thought was, 'How in the world does that lady get the surface so smooth!?' I was constantly dealing with weird drips, lines, or places where I would accidentally touch the surface and screw it all up. I had bunny stalactites, for pete's sake. Not normal looking.
I later re-read the tutorial, and she uses something called 'Paramount Crystals' to help with the melting, which I immediately dismissed, bc I knew I'd never find it over here. It must be some magical powder, that's all I have to say. Like the opposite of Kryptonite for Superman. There probably actually is such a substance, but I have no idea what it is, and no room in my brain for more pointless information. I'm visiting my mom in a month, and I'll need all the space I can spare.


So I had weird, lumpy issues. And stalactites. At least they were staying on the sticks.


Bunnies with tails and ears, and one seriously disturbing 'egg'


I was using tic tacs for ears, which ended up being too short. Combined with the really round bodies, they looked exactly like albino pigs. I figured I'd better get faces on these suckers pronto.
But, sadly, I was having a pen malfunction. I actually found edible markers out here, although in pink and purple instead of black.

It'll do.


If they actually worked.


What the heck, Wilton!? I could not get these things to write if my life depended on it. Due to the frantic repeating of the pattern 10 times per pig, it came off looking like a 5 year old scribbled on it. Also, my hand became covered in scribbles, as I was testing the pen periodically, and when I'm in the zone, cleanup is less than a secondary concern. It is only later, when I realize I am permanently marked for the next week that I reconsider my actions.
It went downhill from there. I have been beaten by cake pops. I finally just gave up and I realized there was no way in hell I was letting anyone see these things, and it was midnight and I had to go to work the next day. Carnage below.

aftermath

How the pops are supposed to look:

Iisn't he ADORABLE!? too bad I couldn't find the 'rainbow chips' for his face and wings. Let's improvise!


Very cute eggs. Where does she find all those different sprinkles?!


bunny bottoms


Faces with appropriate ears

Ok, now are you ready for the horror show? This is so embarassing....


Say hello to the Sad Bod Squad.

What's so depressing is that the bunnies came out best. Shudder


WHAT IS THAT!? A bowling ball? Now, this kind of ticked me off, because what color would you say this little guy is? Orange. He is freaking orange, and I have no idea how that happened. I used my yellow dye. Heavens knows my hands/counter tops/everything else was stained yellow. My chickies, however, remained this mysterious puke orange color. WHAT IS GOING ON!? Usually this would intrigue me; what is going on with the chemistry of these two items that results in the change of color? But for now I was only pissed. It was at this point that I gave up, and just started slapping on my ill-advised modified chick parts.


Paint a sloppy line on my one surviving 'egg', sprinkle on some homemade colored sugar, which clumps, and snap a truly depressing picture. The discrepancies - I am used to things turning out at least somewhat like the picture. Not today.


David came home from the office (yes, at 12:30am) and enthusiastically proclaimed them adorable, to which I attribute to the late hour, and to the fact that his brain was fried.

Cake Pops: 1, Me: -20.


Although, they were magically delicious, if you could make yourself eat something so hideous. I will probably try some variation of these again at some point, when the frustration of this has faded, and my boredom level is high.


I had my revenge.


Cake Pop Basic Directions
Use this basic start as a canvas for whatever you would like to make!
1 box cake mix (cook as directed on box for 13 X 9 cake)
1 can frosting (16 oz.)
candy melts (1 lb. pkg.)
Various Sprinkles
  • After cake is cooked and cooled completely, crumble into large bowl.
  • Mix thoroughly with 1 can frosting. (I use the back of a large spoon, but it may be easier to use fingers to mix together. But, be warned, it will get messy. Also, you may not need the entire can of frosting, so start out by using almost the entire can and add more if you need to.)
  • Roll mixture into quarter size balls and place on wax paper covered cookie sheet. (Should make 45-50)
  • Melt chocolate in the microwave per directions on package. (30 sec intervals, stirring in between.)
  • Dip the tip of your lollipop stick in a little of the melted candy coating and insert into the cake balls. (Insert a little less than halfway.)
  • Place them in the freezer for a little while to firm up.
  • Once firm, carefully insert the cake ball into the candy coating by holding the lollipop stick and rotating until covered. Once covered remove and softly tap and rotate until the excess chocolate falls off. Don't tap too hard or the cake ball will fall off, too.
  • Place in a styrofoam block to dry.
  • Once dry, draw faces with an edible ink pen and allow ink to dry!
  • Pray

Sunday, April 12, 2009

Lily's Last Beach Day


Today was Lily's last day at the beach, since she'll be flying back to Texas this Friday. She had a great time, and I'm just KICKING myself that we never video taped her beach freak out stage. I'm usually too busy laughing, egging her on, and reassuring people with small children that she won't eat their kids. All these pics were taken after she had run so much and so fast, her feet were killing her.

Tired

David taking care of her - washing out and inspecting her feet.
Plumber Patrol!
Love you, dear.


Not too tired for frisbee


With moi

Friday, April 10, 2009

Bonjour! Como Estas?

I have a dilemma. I like learning, just not things that are actually useful in getting a job. A good example of this is that I really want to learn French. Why? I live in TX (or will, soon), and Spanish is the smart choice. So I'm confused too. Perhaps there is a small, suppressed part of me that is an uber-snob. It is probably right next to the larger part of me that is reserved for loving Brie. I just can't get into the Spanish culture. I think it is unique and interesting, but I don't like beans, so all cuisine is out. That's probably enough for me to lose interest right there. Also, the French love pastries. It's just no contest.

The problem is my logical side thinks that if I'm going to spend all the time and effort it takes to become fluent in something, I might as well be able to use it more than once every 5 years. On the other hand, I don’t have the real drive required to learn a foreign language when that language is Spanish. There is no passion. I did the whole '4 years of Spanish' in high school, because back then I was apparently more into a productive future than I am now. Would countless jobs open up to me if I knew Spanish? Sure! Is it is smart decision? Of course! Do I really care in the end? Sadly, I don't think so. Poor David. Put your head between your knees and take deep breaths, dear.

Most of us know some Spanish. However, like all languages, if you don’t use it, it fades away. A noun here, a verb there, until you eventually end up sounding like an evil baby. Fo example, in the grocery store: ''Me like the two meats of cow having here.'' Also, properly conjugating is an issue. You would have to start buying two of everything, because there is no way you're going to remember whether to use the feminine or masculine article for everything under the sun. But…loophole! In French, the plural form is the same for everything. So, you can get 2 boxes of waffles to go in your 2 toasters at home without looking like a neanderthal. Nice.

It's only been 9 years (!), and I am already left with vague, random Spanish sentences. ' Go left!' 'I'm going to the bathroom' and 'When I was six, I hated spinach' are all still firmly ensconced in my brain. However, actual helpful things, like, 'I would like one of these' have long since fallen by the wayside.

So I'm at a loss. Should I do what I want, or what is practical? What do you think?

寿司 (すし)


When I started with this whole idea of 'one food adventure a week' thing, I immediately knew I was going to do sushi at some point. It is just everywhere here, and my view of it has changed from 'high-class fancy' to 'everyday food'. So, I had to try to make it myself.


Alright- sushi history lesson, Tiffany-style! Which means only marginally accurate, with changes to the truth flippantly made if I think it would be funny enough.

Basically, back in the day there was no real refrigeration, without all the electricity and whatnot. So the Asian folk had to preserve their food somehow, and what they had on hand was a shitload of rice. So, they would soak the rice in vinegar, and then pack a ton of it around each fish. Later, they would break open the rice shells and eat the fish, which I suppose had been preserved by the vinegar. Although, there had to be some spoilage, at least in the rice. The smell must have been…potent. Who would want to eat that? Maybe it's the real reason Asians are so damn skinny.

Anyway, for this reason, I'm amazed that sushi was born when someone who must have had way too much saki decided to eat the rice with the fish. Viola! Sushi. And probably some kind of dysentery.

Today, the name 'sushi' means 'it's sour', and actually refers to the rice, not the fish. You learn something new every day.


I had visions of going to Chinatown and buying fresh fish and produce for my rolls. Chinatown has all kinds of awesome stuff, usually pretty cheap (for out here). Open markets, produce stalls, actual butchers, and noodle shops, which are my favorite. I really want to buy some fresh noodles at some point, but I'm not sure how to order, and not looking like an idiot is pretty high on my list of daily to-do's. I'll get over it and go in there sometime soon.

Did you guys watch Sesame Street when you were a kid? Do you remember that song, 'One of these things is not like the other; one of these things does not belong…'? well, whenever I'm in Chinatown, that song plays cheerfully through my head on an endless loop while I hunch down and try to look inconspicuous.

Anyway, reality set in, and I realized that it was kind of scary buying fish I wasn't going to cook out of stalls and the back of vans. So I chickened out and went to Whole Foods. Don't judge me.


The rest of the stuff I just got at the regular market. Many things were labelled with Japanese script, so I wasn't exactly sure what I was buying, but it made me feel cool.


'Massaging' the rice. Apparently I shouldn't quit my day job

The part that scared me the most about making this was the rice. Rice is integral! And me and starch don't have that good a history. I'm always overcooking pasta into a glutenous mass.
Rice isn't very far behind in that regard.

So I bought a rice cooker. The ease of stress alone was worth it, since it was only like $10, a bit of the bottom burned. I chose to think of the burned layer as a protective barrier for the rest of the rice.

Spreading sticky rice - harder than it looks. Also, I have man hands.

I have a little book on how to make sushi, and it came with a DVD (!) so the whole time I was watching the thing in sporadic bursts on the XBOX. Hence the controller above. There was lots of rice washing and specific ways you can touch the rice - I apparently screwed it up, because my rice was a bit too clumpy. I blame the rice cooker.


Ready for some 魚 (fishies)

After the rice was all vinegared up, I started in on slicing fish, which ended up being harder than I thought it would. I kind of mangled some very nice, expensive fish. It's hard, ok!? There was sadness.

After this it was time to put everything together, and again, I got too excited to take pictures. Plus this was taking WAYY longer than I thought it would, and I had a husband in danger of going into a Hunger Coma on my hands. I also scrapped the miso soup idea, which is usually kind of a must with sushi, really. Love it.

David took over for a second with the camera. As you can see, he can hardly stand upright to snap a photo. This man needs food, quick!

Being a dork in our hallway kitchen

Rolling up the sushi with my nifty mat! The level of difficulty of getting the rice out of the mat later was pretty high - less nifty.
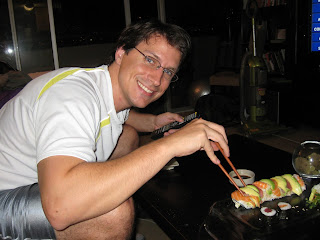
Sushi = seaweed square + rice + random fish bits/avocado. Roll and slice. The rolls were generally pretty until my knife got a hold of it. Apparently, they are really dull, because there was more squishing than actual cutting. Kind of pissed.


Sushi Feast. Sort of.

Anyway, this was my final product. I made a Rainbow Roll, various nigiri sushi, a maki roll, -something random in the middle because I forgot to use my sesame seeds, and by god, I was going to -and finally, a hand roll. Cuz I think they're pretty, but annoying to actually eat (too much seaweed at once). I think we ended up throwing it out.

How do you like that presentation? I know all the cool chefs use overturned Pyrex for their presentation.

I don't have any platters, ok!? They are probably in a box in Corene's garage.


David, overjoyed to finally being allowed to eat.


The nigiri sushi! Salmon, Ahi, and shrimp.


Extreme closeup of Rainbow roll. Supposed to be a California roll with slices of fish and avocado on top. My roll is looking a little anemic.


Salmon avocado roll. Sesame seed usage! ah ha ha ha!


I like a lot of avocado on my rolls.


The photogenic but never eaten hand roll.


Maki rolls! Love the simplicity. I made Ahi and Salmon ones.


All in all, a fun venture. But, a pain in the butt. I don't know if I'll ever do it again. It is hard to get the rice seasoned just right, and it ends up being time-consuming. I think I'll hit up the grocery store and get my California roll for $6 in the future.


Sushi smile! Because I'm a big dork. Not like this is news to anyone.

*My thanks to Josh Whetstone, Japanese speaker extraordinaire, who provided all the translations for this post.*